
Monday, December 31, 2012
Happy New Year Everybody!!
I hope this year brings peace and happiness to everyone, I wish everyone the strengh to get through any problems they may have, and I wish Obama the power to get this Country back on its feet, and stop the suffering of many.If we go into the New Year with hope and positive thinking,together we can make it through,Love you all, wishing you all the best ~Thushara~
Secret codes for samsung galaxy y
The secret codes of android os are very easy intersting similar to its performance,it allows enable/disable different types of settings and it can be handy for you in many situations,therefore here we are giving some general infoemation related to these secret codes,these codes may allow you to access those things which are not abaliable by default,

*#+#4636#+#+ phone information
*#0*# lcd test
* #1234# to check software version of phone.
*#12580*369# to check software and hardware information.
*#0228# Battery status (ADC, RSSI reading)
*#32489# Service mode
*#7780# factory data reset galaxy y
*2767*3855# Full factory reset (Don't dial it does not ask you to confirm unless you have problem)
These codes will work on all the models of galaxy series.
thanks :)
Installing adobe flash player 11 on samsung galaxy y

Here is a working adobe flash player version for our samsung galaxy y,i dont not take any credit for modifying it to work with ARMv6,This is where i found it from, Click here
This flash player workds on stock browser! I tested it myself
So lets begin,First of all,you would need the apk and lib.zip
Adobe flash player : Click here to download If this link dosent work try mirror
Mirror : Adobe flash player 11 apk
Lib.Zip : lib.zip
Rom ToolBoX Lite : Rom toolbox lite
Rom toolbox lite is if you do not have root explorer,it is your choice with which one you want to do this,
After you've finished downloading the apk and lib.zip. put the 2 files into your sd card and extract the lib.zip wherever you want (root directory preffered for quicker use)
After installing, goto any Root Browser.
4. Goto /data/data & goto com.adobe.flashplayer and open the folder; then delete existing lib folder.
5. After deleting, replace with one I have attached below the post.
6. When replaced, again goto /data/data/com.adobe.flashplayer/lib; then there are two files:
+ libflashplayer.so
+ libstagefright_froyo.so
7. Set & save permissions of libflashplayer.so to

8. Set & save permissions of libstagefright_froyo.so to

9. Set & save the permissions of lib folder to

10. Now lastly, set & save permissions of com.adobe.flashplayer to

You’ve done with only 10 small & easy steps; it’s tested & 100% working on Stock ROM & Custom ROMs.
Overclock samsung galaxy y to 900 MHz
Overclock samsung galaxy y to 900 MHz

Today friends i will tell you how to Overclock you Samsung Galaxy Y to 900 MHz.
The normal frequency of the processor is 832 MHz. This means that you will get an extra 68 MHz. I think you would be able to feel the speed of this 68 MHz. Some games which lag in Samsung Galaxy Y will not lag because of the extra frequency of the processor. You will meed to flash a custom kernel made by XDA dev Maroc-OS and all credits goes to him. Overclocking may decrease your battery, so remember this thing and don’t comment that the battery is decreased. Remember to install Custom Rom like Creeds Rom or Infected Rom (Both Recommended).
The normal frequency of the processor is 832 MHz. This means that you will get an extra 68 MHz. I think you would be able to feel the speed of this 68 MHz. Some games which lag in Samsung Galaxy Y will not lag because of the extra frequency of the processor. You will meed to flash a custom kernel made by XDA dev Maroc-OS and all credits goes to him. Overclocking may decrease your battery, so remember this thing and don’t comment that the battery is decreased. Remember to install Custom Rom like Creeds Rom or Infected Rom (Both Recommended).
Now Here We Go :-
1. Install Odin v1.85 (Download link)
2. Download the Kernel for Overclocking Samsung Galaxy Y
Click here to download If this link dosent work try mirror
Mirror : (Download link)
3. Turn Off your Samsung Galaxy Y
4. Press Volume Down, Home and Power button together till the Samsung logo appears and then leave it. Your Samsung Galaxy Y will be in Download Mode.
5. Connect your Samsung Galaxy Y to your Computer
6. Open Odin. Odin will detect you Samsung Galaxy Y.
7. Now choose PDA and the kernel file you downloaded (boot_0.8.00_RC_10.tar)
8. Leave other files empty and then click Start. Once the process is completed your Samsung Galaxy Y will Reboot and the kernel is installed.
9. Install No Frills CPU to Overclock it to 900 MHz (Google Play)
10. The Most important Step Enjoy the Speed.
Comment if you liked My Post
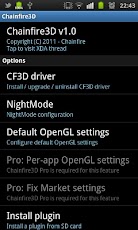
Chainfire 3D for Samsung Galaxy Y and All Android Devices

How to install Chainfire 3D to any android devices tutorial! (recommended for Galaxy mini, Galaxy y, Galaxy fit etc) Chainfire3D - Take control of your GPU OpenGL!Take control over your GPU! Chainfire3D is an intermediary OpenGL driver. What does that mean? It means that Chainfire3D sits between your apps and the graphics drivers, and can intercept and/or change commands between the two. It has some built-in functions, and can be further extended with plugins to provide extra functionality.
ROOT is required for this program, as well as a writable /system partition. S-OFF is also required on HTC devices .
Features include reducing texture size and quality to reduce memory use and potentially increase game performance, as well as increasing memory use potentially increase performance.
If you also install the (experimental) EGL driver, AND your GPU supports it, AND you have the Pro version, you can enable 4xMSAA or 16xMSAA on a per-app bases. This can drastically improve image quality!
How to Install:
1) Install Chainfire 3D apk
2) Install Chainfire 3D pro(license) apk
3) Chose a Plug-ins file, unpack it in SD.
4) Open chainfire3D then allow super user.
5) Select the CF3D Driver, and then Install. Phone restarts.
6) Start the Chainfire3D and select the item Install plugin.
7) Wait till it found plug-ins .zip file
8) Install libGLEMU_POWERVR.zip (for PowerVR)
libGLEMU_NVIDIA.zip (for Nvidia)
libGLEMU_QUALCOMM.zip (for Qualcomm)
9) Fix market setting
10) After this, go to Default OpenGL settings -> Use plugin
11) Choose POWERVR/Qualcomm/Tegra (according to your GPU or Certain games)
12) Minimize Chainfire3D
Thats it! We are done installing Chainfire 3D!
Compatible devices: Its working on all modern android devices. But I strongly recommend it for low end android devices like (Galaxy Mini, Young Y, Fit, Wildfire S, Lg Optimus one) to get better graphical performance from the devices.

Speed Up your Samsung Galaxy Y with V6 Supercharger
Having trouble with RAM problems on your Android phone? Well, this script mod, called V6 SUPERCHARGER [U9RC6.1] fixes all your RAM problems. So you can get a faster, and snappier Android device, suitable for multi-tasking even at not-so-high RAM.

Benefits:
- It makes your phone FAST. Super snappy with better multitasking!
- It rearranges and fixes the OOM (Out of Memory) Groupings and Priorites and low memory killer values. So basically, it’s acomplete memory management fix.
- No Launcher Redraws. Faster than ever, better multitasking.
The V6SuperCharger works on all android devices. Here is an optimal config, best for Samsung Galaxy Y.
V6 Supercharger w/ Optimal Config for Samsung Galaxy Y
Here are the requirements, and files that you need:
- Your device must be rooted. (tutorial is avaliable on this blog :D )
- Busybox Installer (You can get it from the Android Market)
- Script Manager. (You can get it from the Android Market)
- 3rd Party Keyboard. (Incase Stock won’t work at some case)
- V6 Supercharger V9RC5 Script (You can get the latest, RC6 version from XDA)

General Instructions:
- Run Script Manager. Press MENU > MORE > Advance Options > Config.CHECK Browser as root and press back.
- Locate where is the script in your SDcard. Press then click the SU image, if its green, you’re good to go. Press RUN. (NOTE: For Supercharge Users already, please do an UNSUPERCHARGE / UNKERNELIZED to avoid errors/conflicts. See Option [15] & [16].)
- When asked between BUILD.prop or LOCAL.prop, choose LOCAL.prop since it’s more safe.
- For System Integration. Pick the option YES.
- On the driver’s option, run the [1] option to check your status.
- Now you will see some suggestions there and you 0% Supercharger or 25% (doesn’t matter)
- Pick the [10] Option. You are given the minfrees values of “6, 8, 31, 37, 43, 49″. If the values are like this. Then press Yes.
- Then after that step, when asked for a Restart, just follow.
- After rebooting, run again the script, this time. Pick option [20] for the Nitro Lag Nullifer. Note that this is experimental. It can make your Samsung Galaxy Y faster than ever, Less Lag, or can do nothing. However, it cannot brick your phone, so why not try it?
- Do Option [1] to check if you are now 100% Supercharge. If not, check everything again, you might missed a step.
- Last step we gonna do is the Option [18], the Engine Flush. It will flush your RAM but not like the Task Manager where it closes your application or it will close your 3rd Party Keyboard and etc. This ENGINE FLUSH is a good way if u experience lag but you have still an ample amount of RAM. In short, you can make a habit of this to run anytime you experience LAG.
- After all steps. Pick option [31] to exit the script BUT dont exit script manager. Browse to data/99supercharger.sh. Tap it and make sure it is RUN AS ROOT & BROWSE AS ROOT. It is important that those GREEN and BLUE Icon are ON.
- You can now restart your phone to see if the settings are intact.
- After booting pick option [1] to check again your status. The status should be like this:
=======================================
Launcher is DIE-HARD! ie. SUPERCHARGED!
=======================================
OOM Grouping Fixes ARE in Effect!
That means the boot script ran!Current Values MATCH Prior SuperCharge!
That means that it’s working!
=======================================
Current minfrees = 6,8,31,37,43,49 mb
Prior V6 minfrees= 6,8,31,37,43,49 mb
=======================================
Nitro Lag Nullifier is Installed!
=======================================
You’re good! Enjoy a snappier Android device, especially your Samsung Galaxy Y.
PS. I have tested this one myself. and my sgy is super fast (Especially media scan) :D
How to Increase Internal Phone Memory of Samsung Galaxy Y
Disclaimer: sgygaming will not be responsible nor liable for any damage that might happen to your device during this process though the possibility of any damage is negligible. Try this at your own risk. This process has been tested and verified working on Samsung Galaxy Y.
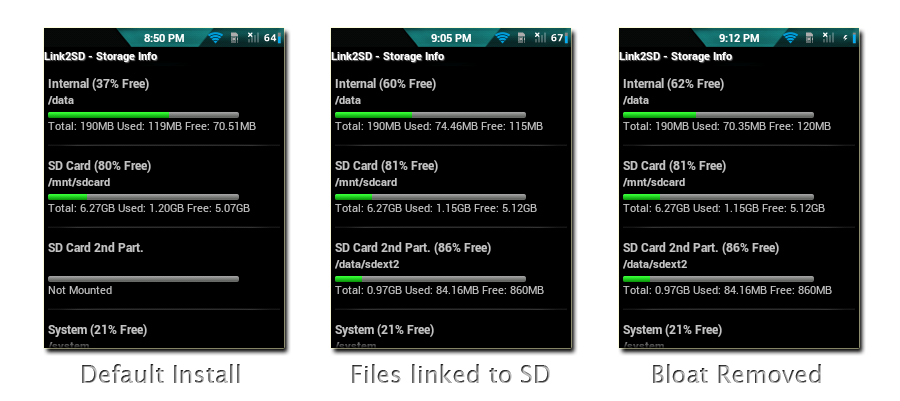
1.ROOT your phone first
2.Download CWM and Link2SD and move to sdcard::
3.Install link2sd
4.Restart in Recovery mode :Volume up +Home button +lock button
5.Select apply update from sd card...Select Skin of CWM...go to advanced and partition
6.Select anything upto 1 gb its ur choice .this wil go in internal mamory..select 0mb
5.reboot...Select Link2sd and select "ext3"
6.reboot
7.LINK the apps to sd which you want .
Links = download CWM from here
install link2sd from google play(market)
Sunday, December 30, 2012
How to install sinhala font on galaxy y

There is a program called Fontomizer, search this on google play and download it and install it,
Step1 : open fontomizer
Step 2 : click on quick start
step 3: go to "s" , click on it
Step 4 ::then click on sinhala fonts and download one of them,both are good so download whatever you prefer
Step 5: font will be downloaded,install it
Step6 : Then go to settings--->display---->screen display---->font style--->select the sinhala font
Step6 : The most important part is to enjoy, go to sinhala webpages using any webbrowser(inculding default android browser)sinhala fonts will work, and it works with facebook app :D
thats it,thanks for comming to my blog :D :D
How To Install Custom Android 4.1 Jelly Bean ROM on Samsung Galaxy Y S5360
Samsung Galaxy Y is surely one of the best ever phone produced by Samsung. Samsung basically created this phone just to serve the common people having a mid-range budget who wanted to taste the Android and they surely did it by keeping the price of Samsung Galaxy Y at around Rs.7,000. Soon after its release, the phone was big hit. Developers from all around the globe too started to take interest in this phone. When the ICS was launched, a custom CyanogenMod 9 ICS ROM was released for Samsung Galaxy Y S5360 and now when the Jelly Bean is out, it’s the right time to get your Samsung Galaxy Y S5360 dirty with custom Jelly Bean ROM. Here is a small tutorial that will show you How To Install Custom Android 4.1 Jelly Bean ROM on Samsung Galaxy Y S5360.

Disclaimer : If anything happens to your device during this process, no one should be held responsible. Perform this on your own risk.
Checklist : Make sure your phone is having 70% remaining battery. All the drivers of your device’s drivers should be installed on your computer. Also make sure you backup everything like Contacts, SMS, MMS, Internet settings, Passwords etc as everything will be wiped off in this procedure. USB Debugging should be enabled (Settings>Developer Options>USB Debugging). Last but not the least, deactivate or uninstall all your antivirus programs, as they can later hinder the process and that’s something which is not wanted.
Note : Your phone must be rooted and should be installed with ClockworkMod Recovery.
Steps to Install Custom Jelly Bean ROM on Samsung Galaxy Y S5360
Step 1 – Download the Custom Jelly Bean ROM for Samsung Galaxy Y S5360 on your computer.
Step 2 – Now connect your phone to the PC and move the downloaded package of Jelly Bean ROM on Samsung Galaxy Y S5360’s SD Card, but don’t dig too deep to place it.
Step 3 – Now disconnect the phone from PC and switch off your phone. Now restart it in the recovery mode, you can do so by pressing and holding Volume Up + Home + Power Button together.
Step 4 – If you get anything like an exclamation mark, hold the Volume Up and Power keys again.
Step 5 – Now using your ClockworkMod Recovery, wipe off everything like data, cache etc. Then flash the downloaded package.
Step 6 – Once everything is wiped off, go to the main menu and select “flash zip from SD card” and press power button to select.
Step 7 – Now select the option which reads “choose zip from sdcard”.
Step 8 – Now use the Volume Keys to navigate and then browse to the location where you saved the downloaded package and start the flashing process.
Step 9 – Wait for the process to be completed, and once it’s done you should reboot your Samsung Galaxy Y S5360.
Step 10 – Once completely rebooted, you will see Android v4.1 Jelly Bean on Samsung Galaxy Y S5360.
Subscribe to:
Posts (Atom)